Creating a 2D Multiplayer Racing Game
Introduction
How do I create a 2d multiplayer racing game with lag and packet loss compensation and
desync-avoidance? To find
this out I will
take a look at the Photon Unity3D Networking Framework and create a project using Photon for the
Unity Engine,
to research this
very topic.
During this project I will research various industry examples and/or documentation to
find my own
optimal solution to
the problems I will face making this application.
I will try to implement my own
synchronization
code based on the
research done and document the process and the things I found out. In the last chapter I will
explain my own
solution and try to
argue why I think it is the optimal solution for my use case.
Setting up the project
Before I can start my research I will have to set up my project with the Photon Unity3D Networking Framework. Since this is not the main focus of my report I will try to spend as little time as possible on this. To actually get to a context where players, steering their cars, will have to synchronize the cars on their client with the other’s, I will first have to do some setting up.
Connecting to a Photon Server
The first step is that you connect with Photon’s servers (Also called the master server). There are 4 ways to connect to a Photon server. 2 of which are cloud servers. Here are all 4 in code:

Figure 1. Connecting to Master options
The first option (and the one I’m using) uses a scriptable object called PhotonServerSettings to
connect to a
Photon Server based
on settings configured in that scriptable object. The second option gives you the option to fill in
a specific
master server
address, a port and your app ID for verification. The app Id is related to the Photon Project from
which you are
making the call.
The 3th option connects you to the best Photon cloud server based on ping and the fourth gives you
an option to
connect to a
Photon cloud server in a given region.
Facilitating connecting to Master in a unity scene, I did with a simple “Connect to Master”
Button

Figure 2. The Connect to master button
Connecting to a Room
The second step is that you connect to a room. In a room is where you start connecting with players, sending data back and forth. There are 4 ways to connect to a room. Here are all 4 in code:

Figure 3. Connecting to Room options
The first option (and the one I’m using) tries joining a room with a given name, room options and
lobby type and
creates one if
there isn’t one already. The second option tries joining a random available room. The third option
joins a room
with given name
and the 4th and last option creates a room with given name and given room options. Joining a room
will fail if
no rooms have been
made yet. This is why I use the first option so I will always have a guaranteed room even if none
has been made
already.
Facilitating connecting to a Room, I did by updating the “Connect to Master” button to a
“Connect to
Room” button when
connecting to master was successful.
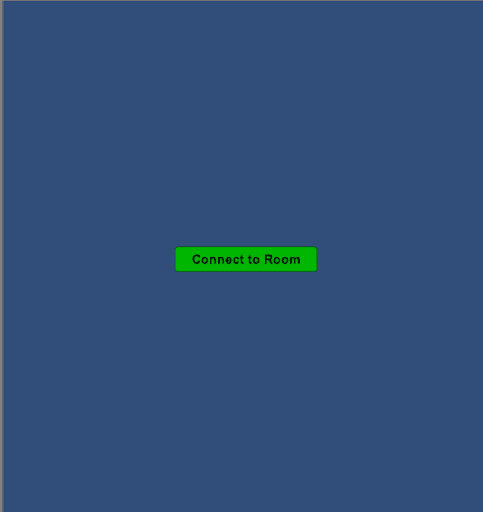
Figure 4. The Connect to room button
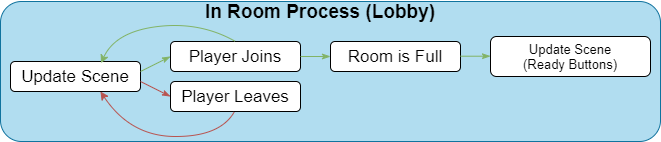
The Room process
When inside the room, there needs to be a way to start the game. There needs to be a definition as
to when the
game can be started
and there also needs to be some sort of authoritative client to actually make the call to start the
game.
Looking at how a
lot of games handle this room setup scenario I think I will follow the lead by introducing ready
buttons for
each player to
communicate their ready status to others. When the last player to ready up has done this, there
needs to be the
authoritative
client to check if all players have readied up or not.
Instead of having a server-client
model,
Photon provides a master client
option, for developers to give additional rights to or give authoritative power. In this room setup
scenario, I
decided that It
would be the master client to check on the ready status of all players and to decide on whether to
start the
game or not.
Facilitating this I added, for each player, a player info item with a ready button.
Players can also
see, in the top left corner,
information on the room they are in.
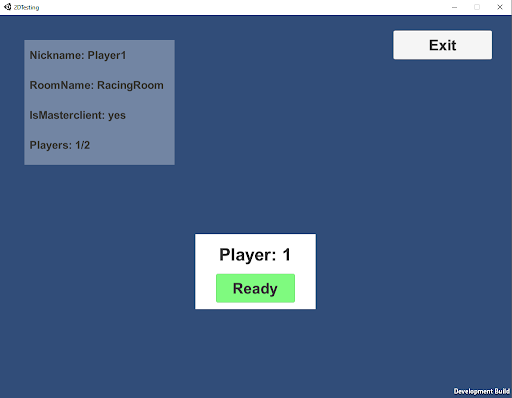
Figure 5. One player inside the room
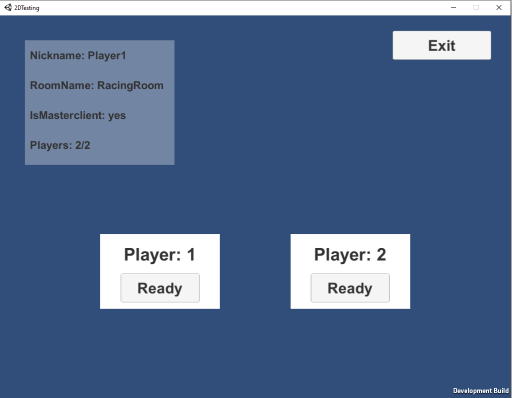
Figure 6. Two players inside the room
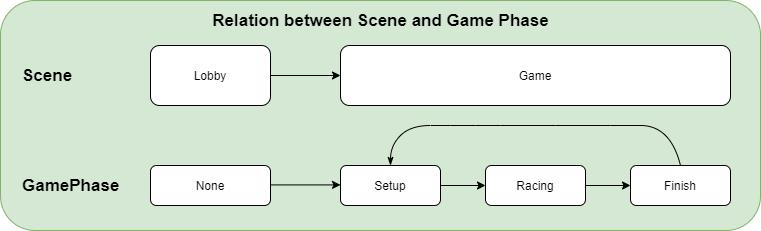
Wanting to visualize the process from opening the application to actually starting the game, I created some diagrams.

Researching Industry Examples
The first big company that I found had some interesting information on Multiplayer Networking was Valve. They had 2 interesting pages which included a lot of documentation on their “Source” engine and its networking, going very much in depth about tick rates and lag compensation. I found a GDC talk by Glenn Fiedler, also known as Gaffer On Games which included a lot of basic knowledge on the different categories of synchronizing objects and optimizing networking especially related to Physics.
Valve their Source engine
On their documentation page about their software they give a short definition of what a server is.
“Usually a
server is a dedicated host that runs the game and is authoritative about world simulation, game
rules and player
input processing” (Bernier, 2019). Communication is done by sending small data packets at a high
frequency. The
clients receive the current world state and generate video and audio output based on these updates.
The server
receives sampled inputs from the clients so it can process these for a new world state update.
Important to note here is that this description relates to a Client-Server networking architecture.
In this
architecture, clients only communicate with the server and not with each other. A peer-to-peer
application would
facilitate this (Bernier, 2019).
Making this work is hard because of the following reasons:
- Network bandwidth is limited, so the server can’t send a new update packet to all clients for every single world change.
- Network packets take a certain amount of time to travel between the client and the server. This means that the client is always a little bit behind the server time.
- Client input packets are, because of reason 2, delayed on their way back. This means the server is always processing temporally delayed user commands.
- Each client has a different network delay which varies over time due to other background traffic and client’s framerate.
- Issues like lag (where packets take longer than normal to travel), packet-loss (where some packets don’t reach the destination) and jitter (where time between packets varies a lot) can cause strange effects to normally smooth gameplay.
Figure 7. Game server ticks visualized
Making this work is hard because of the following reasons:
- Data compression (reducing data footprint when sending, reconstructing it when delivered)
- Lag compensation
The client can then use predictive measures (for example extrapolating) and interpolation to improve
the
experience for the player.
In his chapter about Entity Interpolation Bernier goes in depth as to how the interpolation
is done
exactly.
Since snapping entity states to a given world state would look choppy and jittery (visualized when
implementing
my own code), clients go back in time for rendering, so positions and animations can be continuously
interpolated between two recently received snapshots.
In a scenario where you receive 20 snapshots per second, a new update arrives about every
50
milliseconds ((1
second / 20) x 1000). If the client render time is shifted back 50 milliseconds, entities can always
be
interpolated between the last received snapshot and the snapshot before that.
In the “Source” engine, the client buffers snapshots based on a constant interpolation
period value.
This
constant value defaults to 100 milliseconds. This means that even if a snapshot is lost. The client
can still
linearly interpolate between the snapshot before the one it lost (in the buffer) and the one
received after the
one it lost.
Figure 8. Interpolation between old snapshots visualized
Gaffer On Games GDC Talk
Glenn Fiedler, the founder and CEO of Network Next, Talked during his GDC talk about Networking for Physics programmers. My 2D multiplayer Racing Game uses a lot of physics with car interaction and control, the things he talks about are very relevant to my project. The talk contains a lot of information of which not all is used for my own networking code. Despite that, the information that was relevant really helped bring my project further. The things I was most interested in in his talk was his explanation of the Three Techniques for network synchronization that he distinguishes: Deterministic lockstep, Snapshot interpolation and State Synchronization.
Deterministic Lockstep
Deterministic lockstep is used a lot in real time strategy games where inputs generated on one computer are always the same as on another computer (Fiedler, 2018). This means that the computer’s hardware doesn’t determine the outcome of the input. There are no dependencies there. A low budget computer gives the same result as a high budget one. When a developer chooses to use deterministic lockstep, he only sends and receives player input (for example keyboard input). These inputs can then be used on the client to simulate the behaviors associated with these inputs. This method doesn’t use a lot of bandwidth but requires the game to be deterministic to the byte level.
Snapshot Interpolation
Developers using snapshot interpolation send, in their snapshots, the necessary states that describe an entity in the world. This would mean for a car its position and orientation, and maybe even its velocity. Other clients receiving these states can then interpolate between the states in their scene and the states received in the snapshot. The other clients are interpolating between snapshots. This method is very robust but costs a lot of bandwidth (Fiedler, 2018).
State Synchronization
State synchronization is a method where you as a developer make use of both input and states that describe an entity. With this, you don’t require determinism because you have, alongside the inputs for the simulation, a state to which interpolation can be done to fix problems up (Fiedler, 2018).
Implementing my own synchronization code
Having looked extensively at research on the topic of multiplayer networking I can now create and
test my own
code in the Unity Game Engine using the Photon Unity3D Networking Framework. Before I can start
writing my own
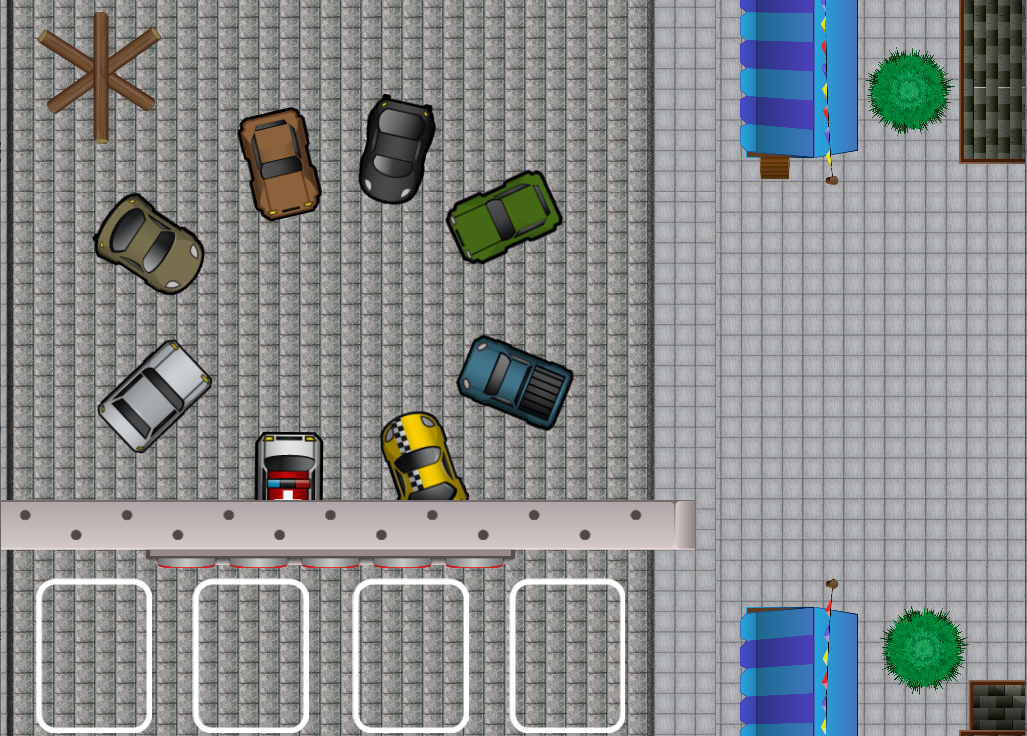
code I have to set up my scene and cars to facilitate this.
I created a road on which players can drive their cars and imported some simple car sprites
to
represent each
player’s car.

Figure 9. Road with simple cars to drive on
I will start off by indicating the remote state of the car (i.e. the last snapshot state I received) as a red marker (I can later change this to a more transparent version of the car).
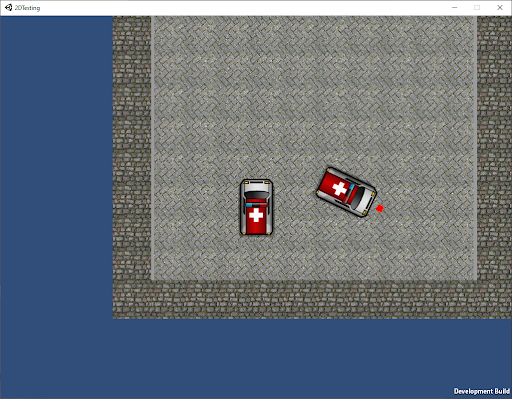
Figure 10. Red indicator to visualize the remote state of the car
I need to test out a lot of different things to eventually get to something I can be proud of and know to be working well. I have to take into account many things when writing my code. My cars make use of a rigid body component to move around and interact with their surroundings. This rigid body component places the car under the control of the physics engine. Since the physics engine produces non deterministic results all the time (Fiedler, 2018), I will have to take this into account when writing my code.
Snapping to newly received snapshots
Knowing why just snapping to a newly received snapshot is not the way to go is always handy.

Figure 11. Code snippet where RB is rigid body component instance

Figure 12.1. Without Lag
Figure 12.2. With Lag
Deterministic lockstep
Sending only player inputs in the context of my game would be to send vertical and horizontal axis inputs (for controlling the car). Doing this, the car movement actually looked pretty good. However, the remote car (shadow car) would come into view a lot, meaning it got out of sync. This was especially true when I started increasing the amount of lag. Also, everything works well until collisions happen and the physics system with its non-determinism creates difference on both clients.
Figure 13.1. Sending only vertical input
Figure 13.2. Sending horizontal and vertical input
Snapshot interpolation
Just interpolating towards the new state of the remote car could also be an option. If I don't simulate anything on my computer and just look at the state that is given to me each snapshot, there won’t be any errors related to non-determinism of the physics engine.

Figure 14. The position of the remote car gets linearly interpolated towards a remote position.
Figure 15.1. Without Lag
Figure 15.2. With Lag
Looking at the movement of the car, it is smooth. Sadly enough it is very much at too great a
distance from the
remote state it should be in. This could definitely be improved upon. Using a method from a dead
reckoning
algorithm where u extrapolate the remote position using the lag and velicity (Aronson, 1997).
Testing this out i started with a simple implementation where i retrieve the position,
rotation and
velocity of the car and update the remote position with velocity times lag
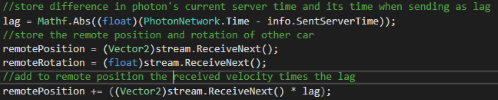
Figure 16.1. Receiving position, rotation and velocity and storing them
And then move towards these “predicted” positions and retrieved rotations.

Figure 16.2. Linearly interpolating to remote position and remote rotation
Looking at the results with high amounts of lag, I found that the linear interpolation actually did a great job. The only thing missing was to create a snap when the position was too far behind or the angle between rotation and remote rotation was too great.
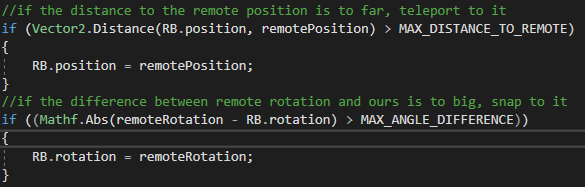
Figure 17. Code snippet where, if a max distance or angle is reached, a snap occurs setting the state directly
Testing this with higher lag amounts, i find that the car does move smoothly but it starts teleporting more frequently, since the speed is lower and the next position/rotation is further away. Increasing the thresholds based on lag did help a lot at higher package loss rates and when having a lot of jitter.
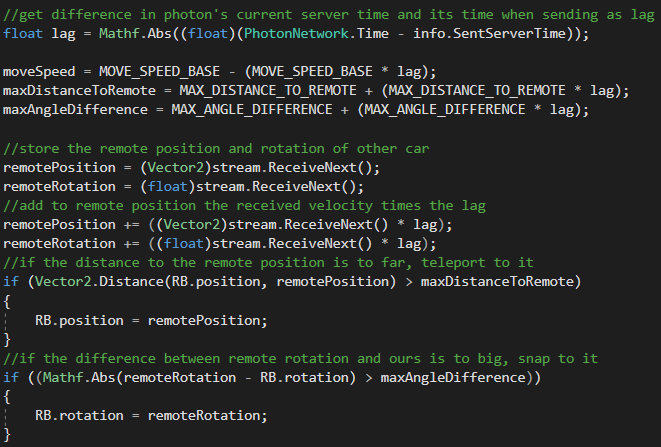
Figure 18. Code snippet where max distance and max angle are updated based on lag
I decided to not expand further on this technique. This is because, while in the process of testing this, I learned more about state synchronization and definitely wanted to try that technique first before expanding too much on one that might not even fit my use case.
State synchronization
After watching the GDC talk on Networking for physics programmers by Glenn Fiedler, i think that this technique fits my game the most. Starting off, I want to test the context in which I used deterministic lockstep and add linear interpolation to change it to a state synchronization technique, sending only position and rotation in addition to input.
Figure 19. Simulating vertical input with sending of position
The result is pretty good in comparison with only the inputs. After the car stands still and lag,
jitter and
packet loss are increased, the car still manages to stay almost on top of the shadow keeping a
smooth movement
along the way.
Using the same technique but with rotation linearly interpolated as well:
Figure 20.1. Without Lag
Figure 20.2. With Lag
With a normal connection the remote car (shadow car) is nowhere to be seen which means we are almost on the remote position each time. Even when, after the connection is simulated to be really bad or a collision happens, the car is still smoothly moving around at the same pace it was with a good connection. The only problem comes when the car gets out of sync when the amount of network interference is high.
Finding an optimal solution
Now that my first iteration of my car-synchronization code is finished I can add more things to test its flexibility. I want to create a boost for the car, adding gameplay and a way of increasing the car’s speed. I also want to add more objects with which the cars can collide.
Car Boosting
After working for a few hours on car boosts I noticed that the speed became a problem for synchronization. At higher speeds, the car would be too far behind the remote car causing desync problems. Currently I don't send velocity in my state synchronization, since cars move mostly at the same time, all the time. Now that I have boosts, the car 's speed can fluctuate very quickly and frequently. I can manage this by adding the same technique(dead reckoning algorithm) as I did with snapshot interpolation where I added the velocity times the lagg, to the remote position (see Figure 18).
Figure 21.1. Without Lag
Figure 22.2. With Lag
Now that i have incorporated velocity into my remote position of the car, i have a better approximation of where it actually is, this means the shadow will appear more frequently since i won’t be at the exact position each time because of the delay. I now have to adapt my linear interpolation in a way that it adapts its speed based on some network related value.
Collision problems
Another problem is that ,with that speed, the errors after collisions need to be corrected very
fast. Otherwise,
even with a good connection, the remote car and the car on our client will be off by too much and I
would need
to teleport it which i don't want. To mitigate this I want to send a colliding flag. This colliding
flag tells
the other client if it is colliding or not. If the remote car is colliding, I can increase my linear
interpolation speed to try and compensate for the indifferences that may occur.
Thinking about these 2 things i came up with this:

Figure 23. trying to incorporate lag and a remote collision flag into the linear interpolation
Figure 24.1. Without Lag
Figure 24.2. With Lag
The result was already a lot better. Without real network interference, the car would mostly stay on
top of the
shadow car, even after collision. The problem however, is that the amount of desync created by
simulated network
interference is way too high. I also still had the problem of collisions pretty much destroying
synchronization
of the car. Since the remote car will never be at the exact location of impact at the same time as
the true car,
the simulation itself will be a lot different, this error margin will get even bigger when the speed
of the car
is increased. To Fix this I have to make sure that the car, even with high speed, would be as close
to the
remote car as possible.
After testing my new setup with another student I got feedback on my new synchronization.
One of the
things I had not tried yet was linear interpolation based on distance between position and remote
position. One
of the
things I also had to accept was that my send rate would need to be a lot higher to make the
simulation more
accurate. According to Photon Network documentation, Send Rate is defined as the amount of packages
sent per
second. In addition to Send Rate there is another value called Serialization Rate, which is defined
as the
amount of time the OnSerialize Function is called(this is used to send and receive data).
Creating the Final solution
I realized the linear interpolation I had always had in my Fixed Update could be moved towards the Update so the linear interpolation would happen more frequently.
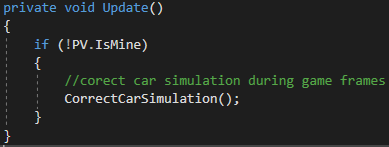
Figure 24. Moving correction of car simulation to game frames
In the linear interpolation I base my interpolation speed of movement on the distance between position and remote position and for rotation based on the angle between rotation and remote rotation. Render time is replaced by tick time because I realized i am linearly interpolating based on server ticks (time between serialization) and not render ticks (Time.deltaTime/ time between render frames).
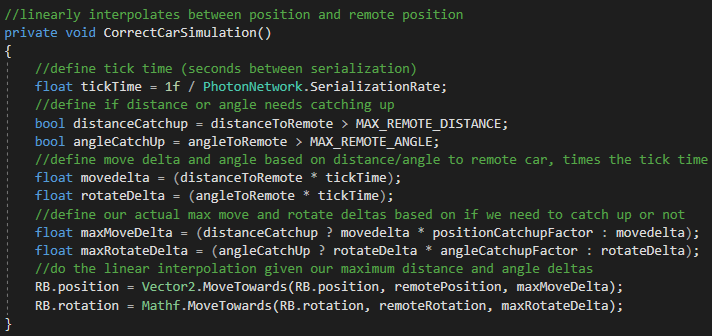
Figure 25. Update correction of car simulation
After receiving a new snapshot and updating all my data, I also check if my car is catching up in some way. If the car is catching up and the remote collision flag is true, it is essential to snap the car to its new position to make sure no further deviation from the true simulation occurs.
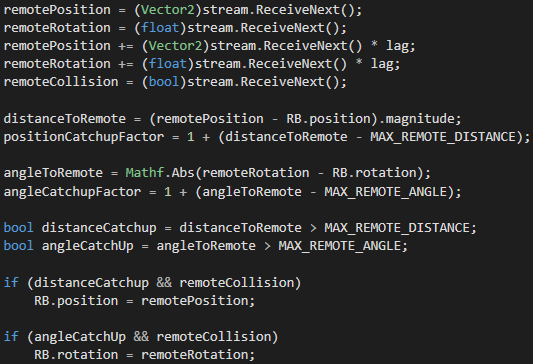
Figure 26. Checking for snap when receiving a new snapshot
I increased the send rate (amount of packages sent per second) and SerializationRate (OnSerialize Ticks per second) to be higher (SendRate was 20 and SerializationRate was 10).

Figure 27.1. Send and serialization rate constants

Figure 27.2. Setting send and serialization rate
The result:
Figure 28.1. Without Lag
Figure 28.2. With average Lag
Figure 28.3. With high amounts of Lag
References
- Bernier, Y. W. (2019, April 20). Source Multiplayer Networking. Retrieved from Valve Developer Community: https://developer.valvesoftware.com/wiki/Source_Multiplayer_Networking
- Fiedler, G. (2018, oktober 2). Networking for Physics Programmers.
- Aronson, J. (1997, September 19). Dead Reckoning: Latency Hiding for Networked Games. Retrieved from Gamasutra: https://www.gamasutra.com/view/feature/131638/dead_reckoning_latency_hiding_for_.php
- Rivenes, L. (2016, juni 21). What is network jitter? Retrieved from datapath.io: https://datapath.io/resources/blog/what-is-network-jitter/